Sok felhasználó szembesül azzal a problémával, hogy „a Steam nem nyílik meg”. Amikor megpróbálnak hozzáférni a Steamhez, a Steam nem indul el, vagy néhány másodperc múlva bezárul. Időnként torlódások lépnek fel a Steam szerverek között, ami megakadályozza, hogy hozzáférjen a Steam tartalomhoz, de többnyire amikor a Steam nem nyílik meg, a probléma a rendszerrel kapcsolatos.
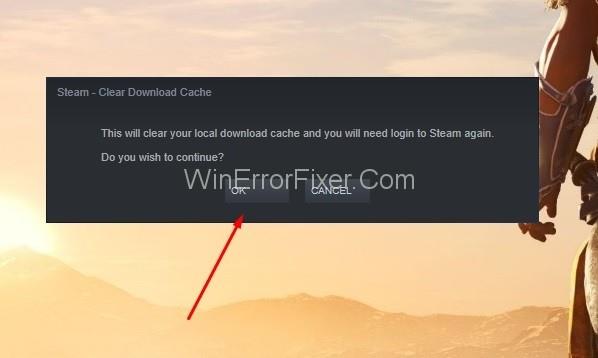
A Steam fájlok sérülése és néhány más program megzavarja a Steam élményt. De nem kell aggódni. Olvassa el az alábbi megoldásokat a Steam nem nyílik meg probléma megoldásához a Windows 10 rendszerben.
Megjegyzés : Mielőtt bármilyen megoldást végrehajtana, készítsen biztonsági másolatot a rendszerről.
Tartalom
A Steam nem nyílik meg számítógépen javítása
1. megoldás: A Steam újraindítása
Sokszor a Steam folyamat a háttérben fut, és így megakadályozza, hogy újrainduljon. Tehát először állítsa le a Steam folyamatokat, amelyek a háttérben futnak, és indítsa újra a folyamatot.
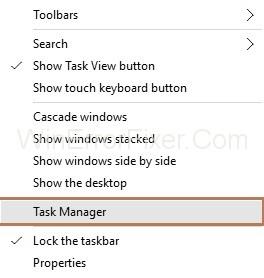
1. lépés : Először kattintson a jobb gombbal a tálcára , és a menüből válassza a „ Feladatkezelő” lehetőséget.
2. lépés : Most kattintson a Folyamatok fülre. A listában keresse meg a Steam folyamatokat. Ezután válassza ki a Steam folyamatot, majd nyomja meg a „ Feladat befejezése ” gombot. Ha nem lát Steam folyamatot, kövessen egy másik módszert.
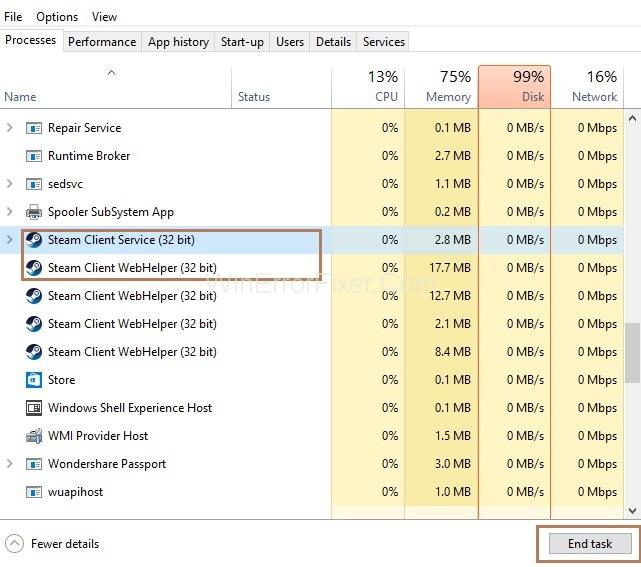
3. lépés : Kövesse újra a 2. lépést, amíg az összes gőzfolyamat be nem zárul. Ezután indítsa újra a gőzölési folyamatot.
2. megoldás: A rendszer újraindítása
Az egyik leggyorsabb és legegyszerűbb módja annak, hogy a Steam nem nyílik meg a Steam megnyitásával kapcsolatos problémát, a rendszer újraindítása.
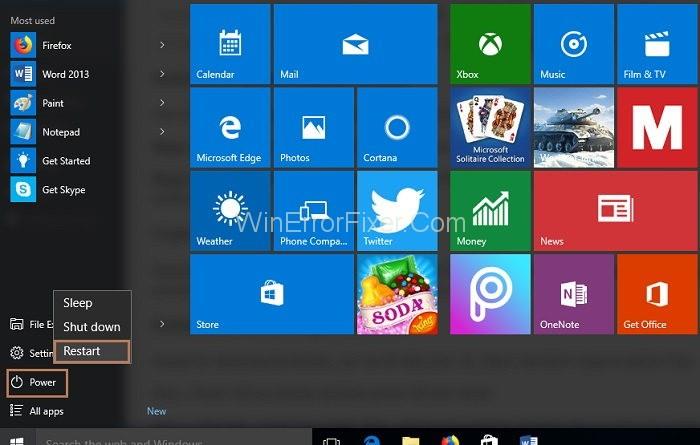
1. lépés : Először kattintson a Start menüre. Ezután nyomja meg a Bekapcsológombot , majd kattintson az Újraindítás gombra .

2. lépés : A rendszer újraindítása után próbálja meg újra megnyitni a Steamet. Ha nem tudja megnyitni, kövesse a következő módszert.
2.1. megoldás: Húzza ki a szükségtelen külső eszközöket
Külső eszközök, például USB-meghajtók, nyomtatók, merevlemezek, extra billentyűzetek és még sok más akadályozzák a Steam folyamatát. Tehát távolítsa el őket, mielőtt újra kinyitná a Steam-et.
3. megoldás: Indítsa újra az útválasztót
Csak a router újraindításával javíthatja ki a Steam nem nyílik meg a hibát. Tehát ennek eléréséhez kövesse az alábbi lépéseket:
1. lépés : Kapcsolja ki a rendszert, majd kapcsolja ki az útválasztót.
2. lépés : Ezután húzza ki az útválasztót. Most várjon két percet, majd csatlakoztassa újra a konnektorhoz. Most várjon ismét két percet, majd kapcsolja be az útválasztót.
3. lépés : Végül kapcsolja be a rendszert.
4. megoldás: A Windows frissítése
A Steam nem nyílik meg probléma gyors megoldásának másik módja a Windows 10 operációs rendszer frissítése, ha az nem frissült, mert a hibás frissítés okozhatja a problémát. A Windows frissítéséhez kövesse az alábbi lépéseket:
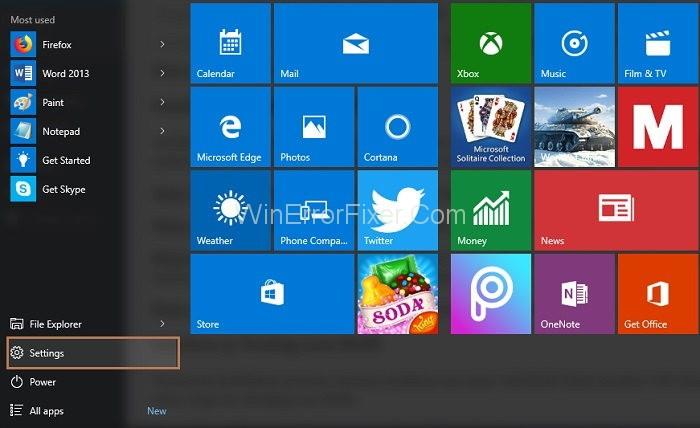
1. lépés : Először a Start menüben kattintson a „ Beállítások ” ikonra.
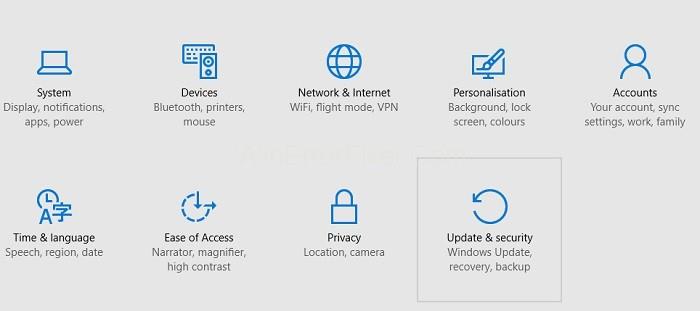
2. lépés : Ezután válassza a „ Frissítések és biztonság ” lehetőséget a beállítások ablakban.
3. lépés : A panel bal oldalán válassza ki a Windows Update lehetőséget a listából. Ezután a jobb oldalon kattintson a Frissítések keresése gombra a Frissítés állapota részben.
4. lépés : A frissítések telepítése után indítsa újra a rendszert a módosítások alkalmazásához.
5. megoldás: A RAM tesztelése
A telepítés során memóriaproblémák léphetnek fel a RAM-mal, ami zavarja a Steam működését. Tehát kövesse az alábbi lépéseket a RAM ellenőrzéséhez:
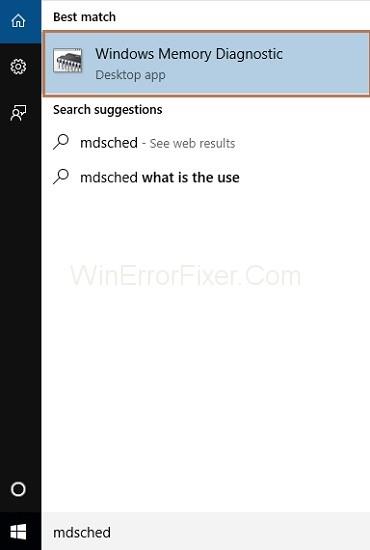
1. lépés : Zárjon be minden programot a rendszerben. Most kattintson a Start menüre, és írja be az „ mdsched ” kifejezést a keresőmezőbe, majd a listából válassza a „ Windows Memory Diagnostic” lehetőséget.
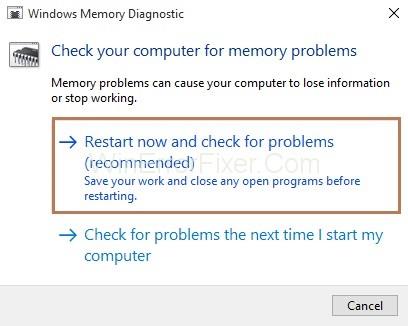
2. lépés : Megjelenik egy felugró ablak. Kattintson az „ Újraindítás és a problémák ellenőrzése” gombra. ”
3. lépés : Most elindul a rendszer memóriaellenőrzése, és a rendszer újraindul. A rendszer újraindítása után kattintson a Start menüre, írja be a keresőmezőbe az „ esemény ” szót, majd válassza az „ Eseménynéző” lehetőséget.

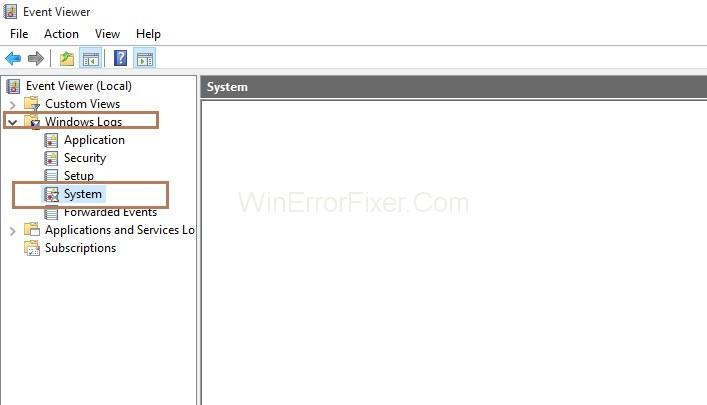
4. lépés : A panel bal oldalán válassza a „ Windows naplók ” lehetőséget, majd a „ Rendszer ” lehetőséget.
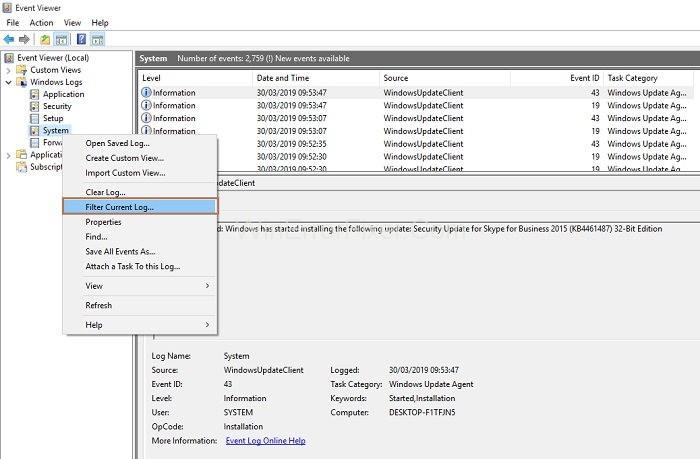
5. lépés : Ezután kattintson a jobb gombbal a „Rendszer” lehetőségre, és válassza a „ Jelenlegi napló szűrése ” lehetőséget a listából. Ennek az opciónak a kiválasztásához először kattintson a bal gombbal a „ Rendszer ” elemre.
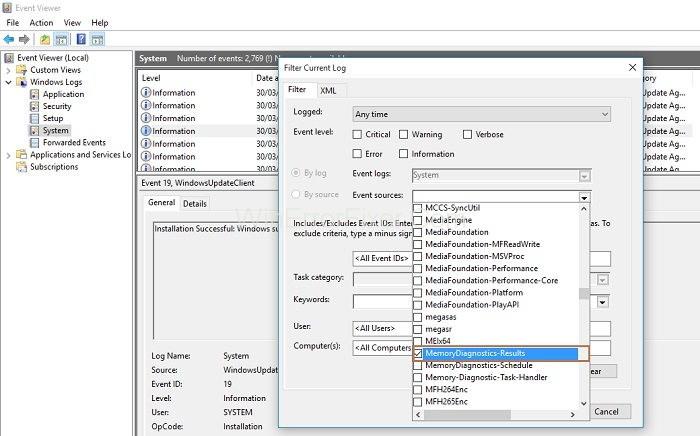
6. lépés : Most a Szűrőnapló ablakban válassza ki a „ MemoryDiagnostics-Results ” opciót az „Eseményforrások” jobb oldalán található legördülő menüből . Ezután kattintson az OK gombra.
7. lépés : Most át lesz irányítva az Eseménynéző ablakba, ahol körülbelül két „Eseményt” fog látni a szűrt naplóban. Válassza ki az egyes eseményeket, és tekintse meg a megjelenített információkat. Ha nem lát hibát, kövesse a következő módszert. Ha hibákat lát, kövesse a következő 8. lépést.
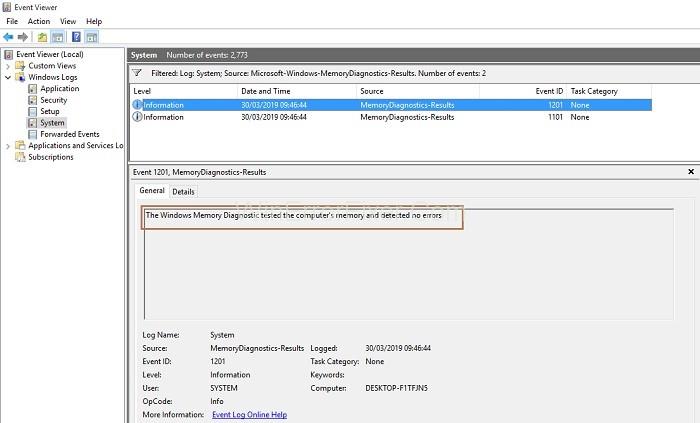
8. lépés : Ha probléma lép fel a RAM-mal, cserélje ki a RAM-kártyákat, és indítsa újra a rendszert. Ezután ismét kövesse az 1–7. lépéseket.
Cserélje ki az összes RAM sticket egyenként. Cserélje ki a hibás rudakat. A sérült RAM-kártyák cseréje után ellenőrizze, hogy a rendszer és a memóriatömörítések visszaálltak-e a normál CPU-használatra.
6. megoldás: A Steam javítása
A módszer végrehajtása előtt mindenképpen készítsen biztonsági másolatot a játékfájlról. Most kövesse az alábbi lépéseket a gőz javításához:
1. lépés : Először nyissa meg a mappát, ahová a Steam telepítve van. A Steam telepített mappájának megnyitásához kövesse a következő elérési utat: File Explorer -> This PC -> Windows C:
Windows C rendszerben keressen steamappokat a keresősávba való beírással. Ezután kattintson jobb gombbal a „steamapps” mappára, és „ másolja ” a Dokumentumok fájlba.
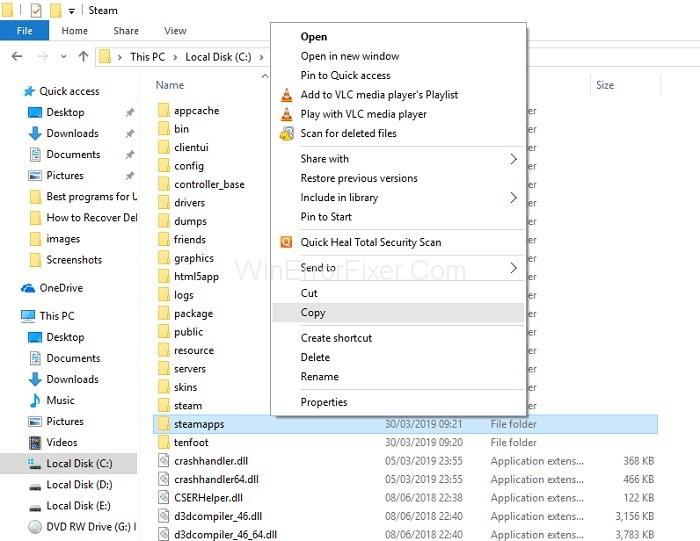
Step 2: Again, right-click the “steamapps” folder and select “Open file location.”
Step 3: After that, go to the official website of Steam and download the Steam installer. After downloading finishes, run the installer. Select the option of repairing the files and follow the prompts.
After this, try to open Steam again. If you are not able to open Steam, follow the next method. If you can open Steam but not able to access your saved game data, then just copy the “steamapps” folder, which is in “My Documents” back in the Steam folder, and removes the file which has the same name from there.
Solution 7: Reinstalling Steam
Before performing this method, make a backup copy of your game files because while reinstalling Steam, some data from online games may get lost even with a backup. However, you should be able to access them with your Steam account.
Step 1: Close the Steam from everywhere, no Steam process should be running in the background. To end the process running in the background, firstly open the Task Manager by right-clicking the taskbar. Secondly, select the “Processes” tab. Then, search for the Steam process in the list of processes and select it. Now, click on the “End task” button. In case, no Steam process is running, go to step 2.
Step 2: As done in the previous method, backup the game file by searching for the Steam folder in your system.
- First, type Steam in the search box of the Start menu.
- Then, select the file Steam.exe by doing right click and now, selecting “Open file location.”
- Look for the file “steamapps.” Then, copy the steamapps file and paste it to “My Documents.”
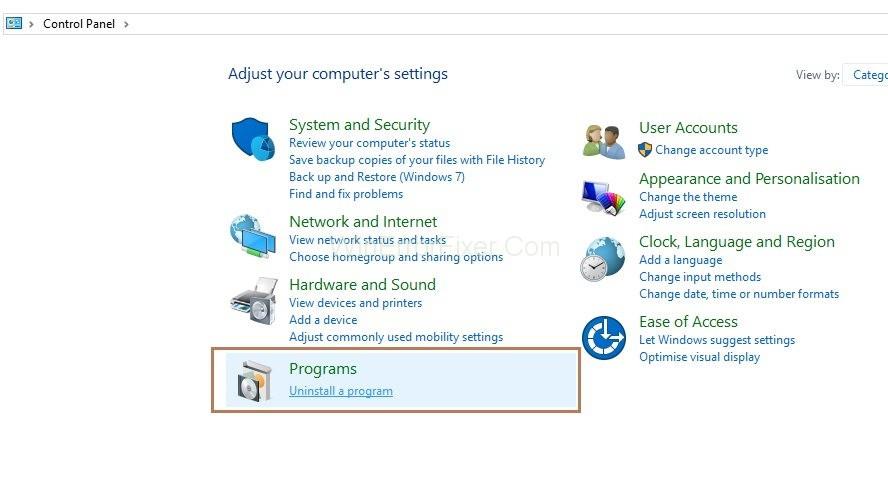
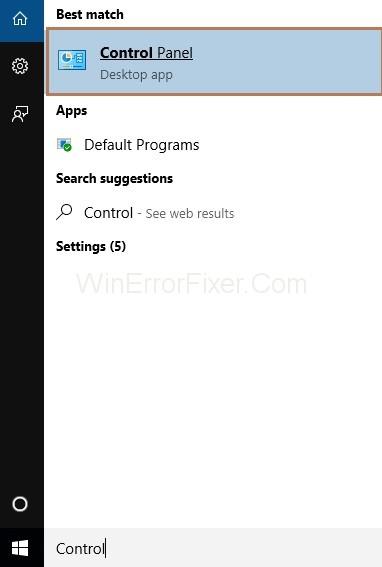
Step 3: Click on the Start menu and enter the “Control Panel” in the search box.
Step 4: Select the option “Uninstall a Program.”
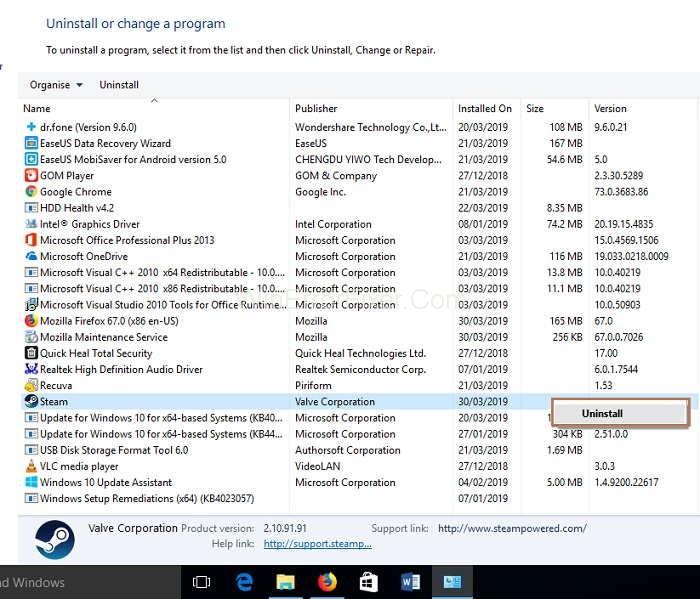
Step 5: Then, look for Steam in the list and select it. Now, click on Uninstall/Change and confirm your uninstallation. After that, Restart your system.
Step 6: After that, go to the official website of Steam and download the Steam installer. After downloading finishes, run the installer. Select the option of repairing the files and follow the prompts. To access your saved game data, just copy the “Steamapps” folder, which is in “My Documents” back in the Steam folder and remove the file which has the same name from there.
Solution 8: Updating the Date and Time
Steam always gathers real-time data from your system, which involves collecting date and time. So, if the date and time are off, then Steam will not open. Follow the below steps to synchronize your date and time settings:
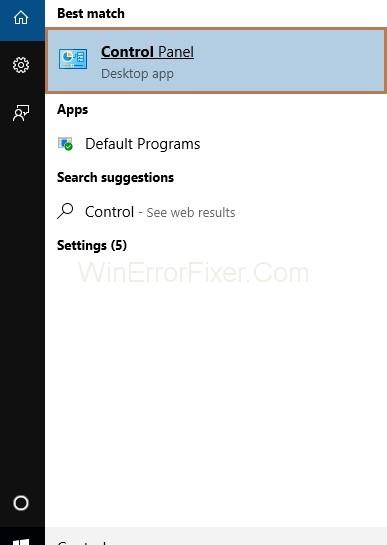
Step 1: Firstly, click on the Start menu and type “Control Panel” in the search box. Then, click on the Control Panel under the Best match section.
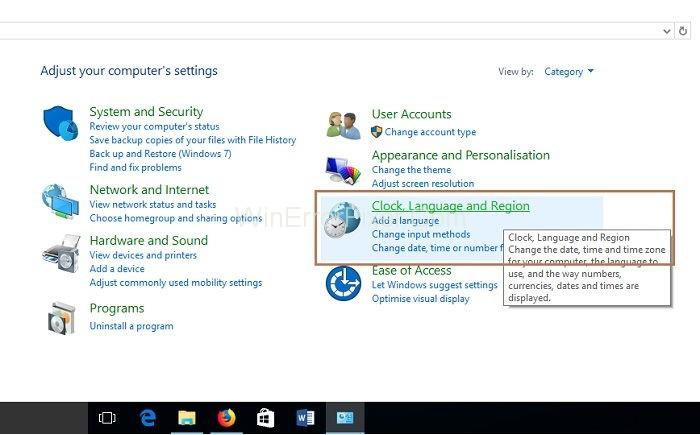
Step 2: Control Panel window will appear, from its select “Clock and Region.”
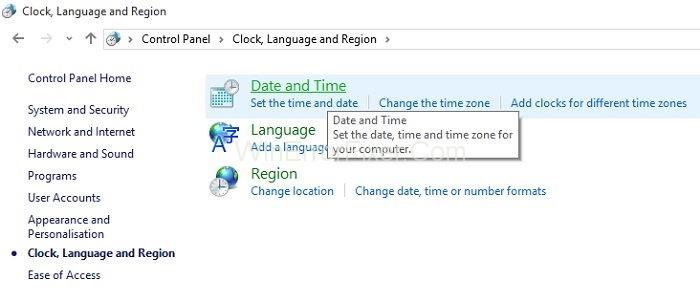
Step 3: Select the “Date and Time” option.
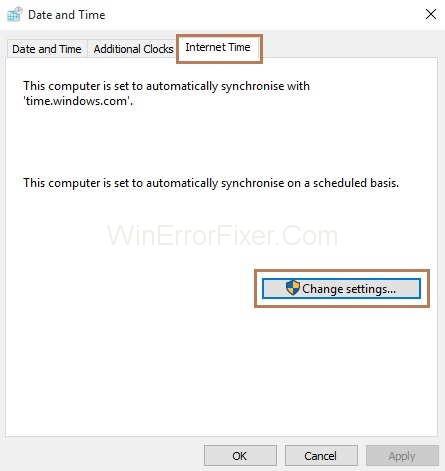
Step 4: Then, a pop-up window will appear, click on the Internet Time tab. Now, click on the “Change settings” button.
Step 5: After that, tick marks the box “Synchronize with an Internet time server.” Click on “Update now.” After the update is over, press the Ok button.
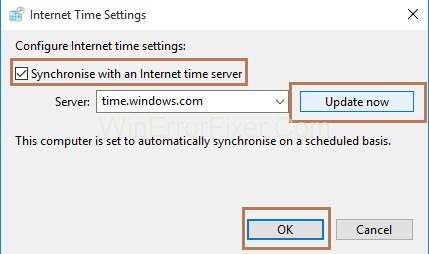
Now check if you can open Steam. If you are not able to open Steam, go to the next method.
Solution 9: Checking your Hard Drive for Errors
Another way to fix the Steam won’t launch is to check your drive for errors and then to repair it because, after long-term use, storage devices can become faulty.
Step 1: In the Start menu, type File Explorer in the search box and then select it under the Best match.
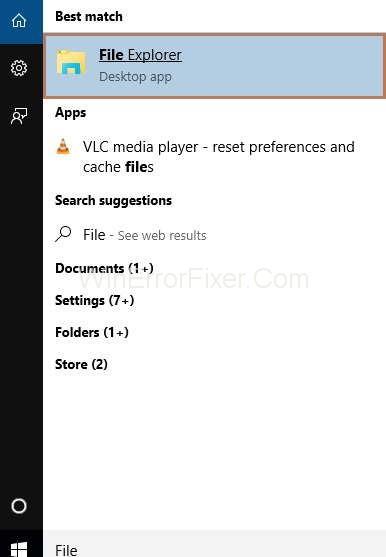
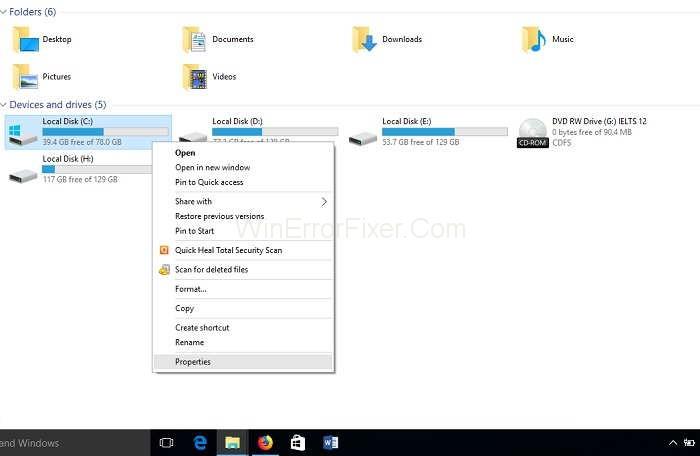
Step 2: On the left side of the window, click on “This PC.” Then, choose the drive you want to fix and right-click on it.
Step 3: Then, from the list, choose “Properties.”
Step 4: A pop-up will appear. From it, choose the “Tools” tab and press the “Check” button. If the error check app has found errors, then you need to scan your drive by clicking on “Scan drive.”
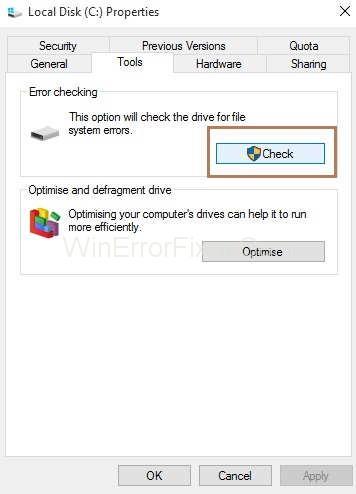
Step 5: After the scanning completes, close the window and try relaunching Steam.
Solution 10: Uninstalling or Disabling Antivirus Program
Many times, third-party antivirus software also prevent Steam from opening because online games use some features that trick antivirus software into thinking it is malicious software.
First of all, check if your Windows Defender is deactivated or not. if another antivirus program is causing a problem. Also, if two antivirus programs are running simultaneously, then it may cause problems.
For deactivating Windows Defender, follow the below steps:
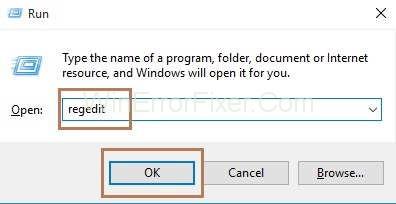
Step 1: At first, press the Windows and R key together from your keyboard to invoke the Run box. Type “regedit” inbox and click on the “Ok” button.
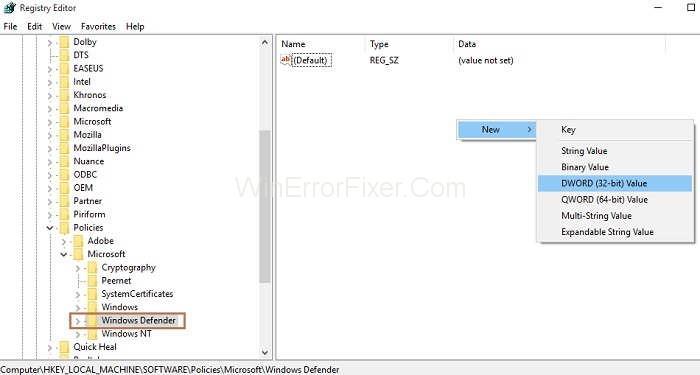
Step 2: Then, open the folders in the following order: HKEY_LOCAL_MACHINE -> Software -> Policies-> Microsoft.
Step 3: At last, select “Windows Defender.” On the right side of the window, double click “DisableAntiSpyware” option from the list. However, if this option is not there, you have to create it. For this, right-click on the blank area and choose “New.” Then, from the menu, select “DWORD (32-bit) Value“. Give it the name “DisableAntiSpyware” and press Enter.
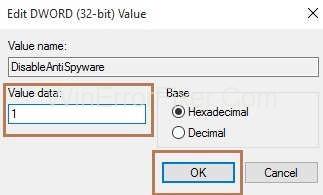
Step 4: After its creation, click on it. Then, modify its current value data to “1“. Click on the “Ok” button.
Finally, restart your computer.
Step 1: Thus, after disabling Windows Defender check if you can access the webpage. If not, then uninstall your antivirus software. So, firstly, press the Windows and X key together from your keyboard. Now, select the option “Settings.”
Step 2: Settings window will appear. Then, select “Apps.” Under the “Apps & Features” submenu, search for your antivirus program. Then, select it and press the “Uninstall” button.
Step 3: Then, Restart your system.
Step 4: Now, if you are not able to open Steam, reinstall your antivirus program and follow the next method. If you can open Steam, try installing some other antivirus program. See how we have disabled the Avast Antivirus completely or temporarily.
Solution 11: Checking if Internet Provider is Interfering with Steam
If the provider which you are using is saving bandwidth by compressing the data, then it might cause the problem in the working of Steam.
So, to test whether Steam is not opening because of Internet Provider, you have to connect on a different network with a different provider. Thus, if Internet Service Provider is the cause of the problem “Steam not opening,” then the only thing you can do is to change the provider.
Solution 12: Updating Drivers
This solution to fix the Steam won’t open issue will take some time, but it will make sure that outdated drivers are not hampering the operation of Steam.
Step 1: Press the Windows and X key together from your keyboard. From the list, select “Device Manager.”
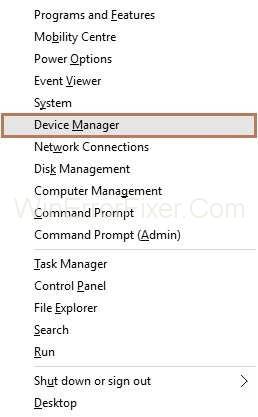
Step 2: Then, just select the first type of device, and it will expand. Now, right-click the first device in the list and choose “Properties.”

Step 3: Click on the “Driver” tab and press the “Update Driver” button.
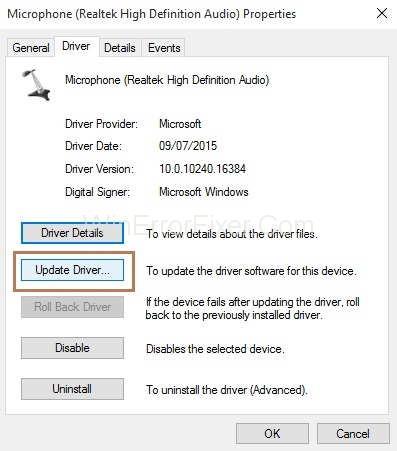
Step 4: A pop-up will appear, and from it, select the option “Search automatically for updated driver software.”
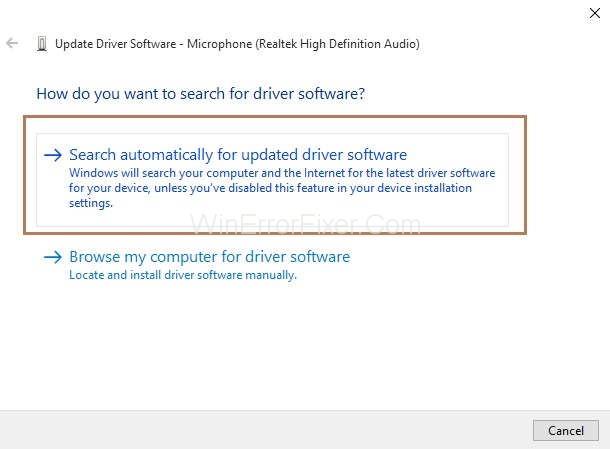
On the other hand, you can also download the latest version of the driver from the manufacturer’s website and then install it manually.
Step 5: Searching will start. Then, after searching, a message will appear on your screen. In case your driver is up-to-date, you will see a message depicting that “the best drivers are already installed.” If not, the system will update the driver automatically.
Now, return to the device manager window (step 2) and do the same for all the devices that are listed.
Step 6: After checking for updates, Restart your system.
At last, check if you can open Steam.
Solution 13: Disabling Overclocking
Overclocking means to set your computer to run at a higher speed than the usual one. This will boost up the performance power but can cause memory corruption issues. So, disabling overclocking might fix the problem of “Steam not opening.”
Step 1: Start with clicking on the Start menu and type “Settings” in the search bar. Then, select the settings option.
Step 2: Among all the options, select “Updates & Security.”
Step 3: From the left side of the pane, select “Recovery,” and under the Advanced section startup, click on “Restart now.”
Step 4: Afterwards, from “Choose an Option” menu, click on “Troubleshoot,” then “Advanced Options,” and at last, click on “UEFI Firmware Settings.”
Step 5: The computer will restart, and the UEFI menu will appear. Choose the option “Reset to default.”
Step 6: Finally, save the changes you have made and exit from BIOS.
Solution 14: Disabling Compatibility Mode
Steam is compatible only with Windows 10. Sometimes Windows 10 itself set the Compatibility Mode when any game error occurs. In other words, in case Compatibility Mode is the problem, then Steam will give you a warning.
For Windows 10 OS, Compatibility Mode can interfere with Steam, so it is not preferred. Also, you need to edit your registry because Windows 10 conceal that it has adjusted.
Note: Make a backup of the registry before performing this method. To back up your registry, follow the steps upto step 6.
Step 1: At first, close all the Steam processes. To do this, you need to the right click on the Taskbar and then choose “Task Manager.”

Step 2: Then, click on the Processes tab. From the list, look for the Steam processes. After that, select the Steam process and then press the “End task” button. Go to step 3, if you don’t see any Steam processes.

Step 3: Enter “Steam” in File Explorer, and after that, right-click “Steam.exe.” From the list, choose “Properties.”
Step 4: Click on the “Compatibility” tab. Uncheck all the options under this tab and press the “Apply” button.
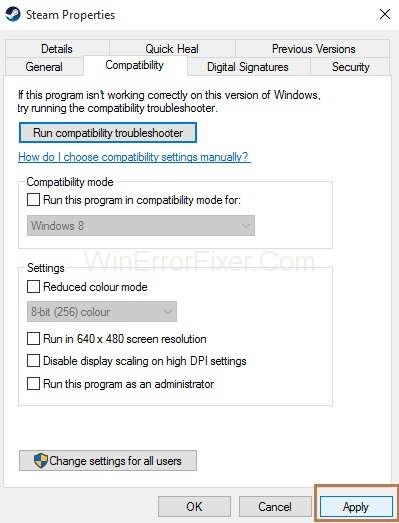
Step 5: After that, click on the button “Change settings for all users.” Check if all other options are unchecked. Finally, press the “Apply” button and “OK” button.
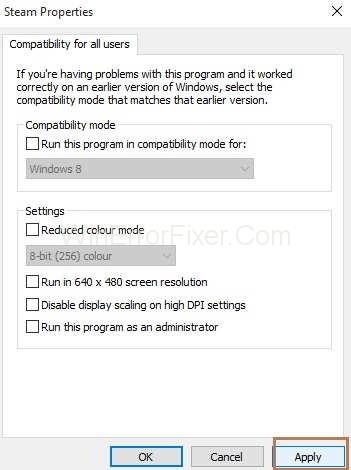
Step 6: Then, exit from Properties window by clicking on the “Ok” button.
Step 7: Now, check if you can launch Steam. If you are not able to start Steam and warning appears on your screen, continue to follow the next steps.
Step 8: Press the Windows and R key together from your keyboard to invoke the Run box. Type “regedit” inbox and click on the “Ok” button.
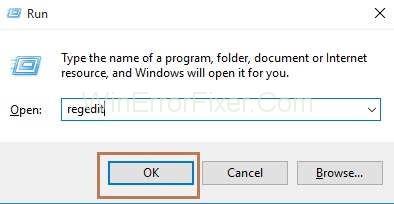
Step 9: From the left side of the window, first expand the folder “HKEY_CURRENT_USER,” and afterwards, “Software.” Then, choose “Microsoft.”
Step 10: Now, expand the folders in the following order: Windows NT -> CurrentVersion -> AppCompatFlags -> Layers
Step 11: On the right side of the window, the list of registry entries will appear. Search for “Steam.exe” and then right-click the Steam.exe entry. Then, select the option “Delete” to delete the entry.
Step 12: Select the AppCompatFlag folder again and then select “Compatibility” and now “Persisted.” Again search for the “Steam.exe” file on the right to delete it as done in the above step.
Step 13: Now, scroll back to the top and now open the folder “HKEY_LOCAL_MACHINE.”
Step 14: Expand the folders in the following order: Software -> Microsoft -> Windows NT -> CurrentVersion -> AppCompatFlags -> Layers. In case no Layers folder is there, just follow the next step. Otherwise, delete the”Steam.exe” file as done in the previous step.
Step 15: At last, close the Registry and try launching the Steam.
Solution 15: Clean Booting your System
Sometimes, third-party applications interfere with Steam, so try restarting your system without these applications to fix the Steam won’t open error. Also, when you clean boot your system, it reboots the system with the essential Microsoft applications running, and the software which tends to change the system, network activity can still interfere with Steam.
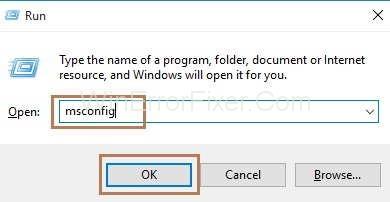
Step 1: At first, log in to your system as an administrator. Then, press the Windows and R key together from your keyboard to invoke the Run box. In the run box, enter “msconfig” and click on the “Ok” button.
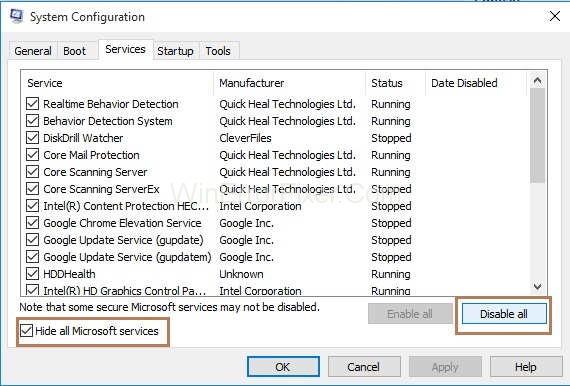
Step 2: System Configuration window will appear. Click on the “Services” tab. Then, tick marks the box next to “Hide all Microsoft services.” At last, press the button, “Disable all.”
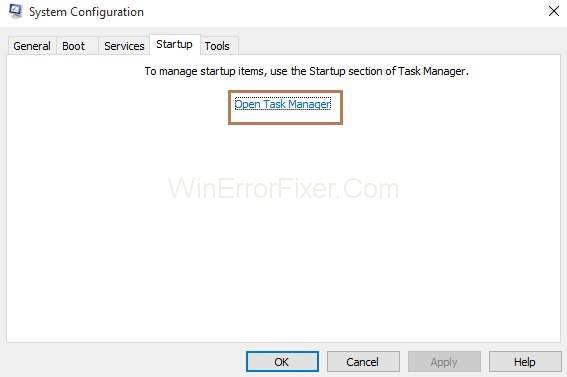
Step 3: Underneath the “Startup” tab, click on “Open Task Manager.”
Step 4: Task Manager will appear. Then, choose the “Startup” tab. Then, select all the items from the list and click on the “Disable” button. Close the Task Manager
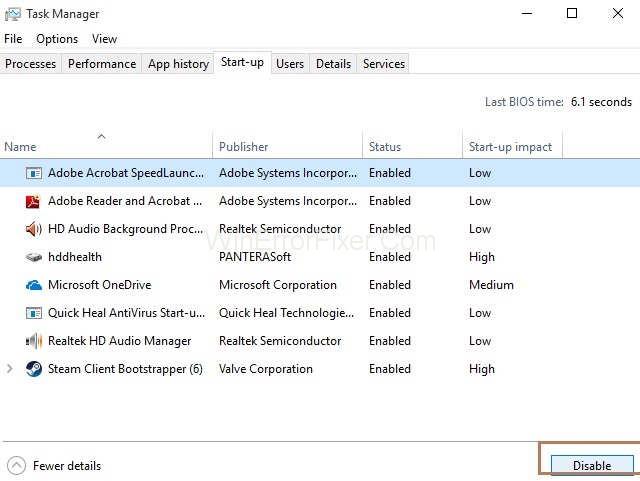
Step 5: In the System Configuration window, click on the “Apply” button to save the changes. Then, press the “OK” button.
At last, restart your system. After restarting the system, check if you can open Steam.
Solution 16: Restoring the System
If you have made a system restore point manually and after that Steam stopped working, then you need to restore the system to that point. Thus, this solution will help you to fix the Steam won’t Open issue by going back to the point before it became an issue.
Step 1: Firstly, click on the Start menu and type “Settings” in the search bar. Then, select the Settings option.
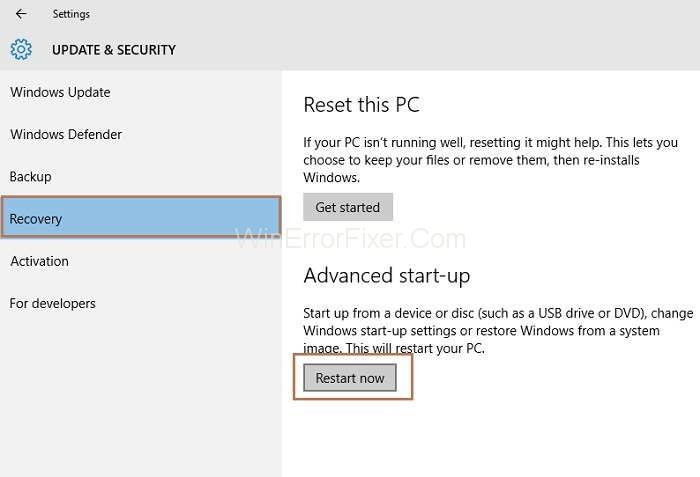
Step 2: From the settings list, click on the option “Updates & Security.” On the left side of the pane, select “Recovery,” and on the right, under the Advanced section startup, click on “Restart now.”
Step 3: After restarting the system, “Choose an option” window will appear and select the option “Troubleshoot.”
Step 4: Then, click on “Advanced options.” Under Advanced options, click on “System Restore.”
After this, you have to choose the restore point, and your system will go back to that point in time.
Related Posts:
Conclusion
Thus, follow the above solutions to fix the Steam Not Opening error, and still, if you are not able to fix it, the problem may be in the Steam program. Also, you can contact Steam’s customer support team.
